

This article is primarily aimed at those who are not familiar with server-side rendering. The first part of this article is an example project with a migration of some client components to the server to help beginners understand. The second part explains the different server-side rendering modes and shows how to implement them simply.
Summary
Migration project
Since version 13 of Next.js, with the introduction of the App Router, it is possible to use RSC (React Server Components) for server-side rendering of pages.
At first glance, this new approach makes it easier to implement SSR, improving, for example, SEO and page load speed…
However, these new RSC, capable of only a single render by definition and not allowing dynamic use of hooks, seem to be an obstacle to implementing client-side interactions.
Today, we will see how to juggle between “server components” (RSC) and “client components” to enable server-side rendering of interactive pages.
But first, let’s define some of the terms that will be used in this article:
- CSR (Client-Side Rendering): This is a technique used in web development where the browser downloads a minimal HTML page and the necessary JavaScript for the page. The JavaScript is then used to hydrate the DOM and render the page.
- SSR (Server-Side Rendering): This technique, used in Next.js, allows generating the HTML content of a page on each server request. When a page uses SSR, the HTML content is generated on-the-fly each time the server receives a request. This means that the rendering occurs on the server, unlike client-side rendering (CSR) where the HTML is generated in the browser after the initial page load.
- RSC (React Server Component): This allows developers to create UI components that are rendered only on the server and sent to the client as HTML. Note that Next.js renders server components as HTML only during the initial request by the client. When navigating using the Next.js router, subsequent page requests return instructions for the client to execute rather than HTML (instead of sending a full HTML document, the server sends JavaScript that dynamically updates the content of the current page).
- SSG (Server-Side Generation): This refers to static rendering generated at the time of the application’s build. When the browser requests the page, the HTML content generated at the application’s build time is returned to the browser.
- ISR (Incremental Static Regeneration): This is a groundbreaking feature of Next.js that allows developers to update static content after the initial build phase. In addition to the initial rendering of traditional static site generation (SSG), which creates pages at build time, ISR regenerates pages on demand after deployment.
Let’s look at a concrete case:
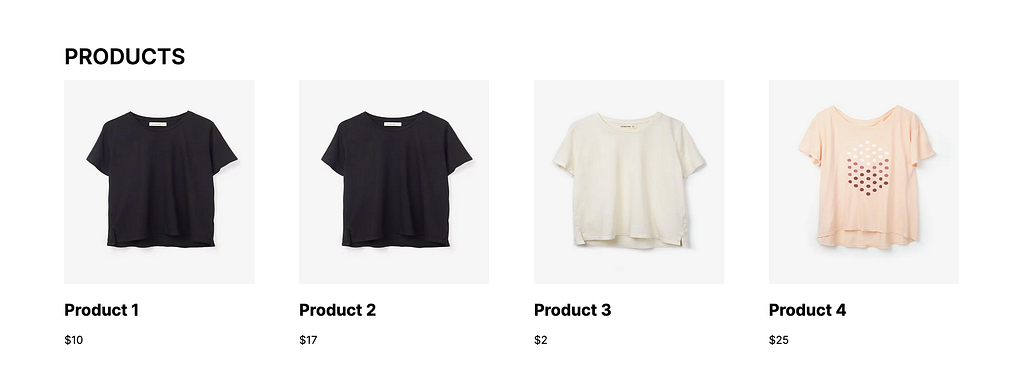
Consider an e-commerce site that offers t-shirts at various prices. The homepage features an infinite scroll with a list of T-shirts for sale. Clicking on a product adds it to the cart, and then the cart opens in a modal, listing all the products in the user’s cart.
This project was initially implemented entirely using CSR (Client-Side Rendering). You can check it out here: NextSSRMigration.
Today, we will explore how to migrate part of our application to server-side rendering, and then compare the different server rendering modes (SSR, SSG, ISR).
However, to begin, we must first ask the right questions:
- Which parts of the application would benefit most from server-side rendering?
- How will the user experience be affected by the change in rendering strategy?
- What are the potential challenges and limitations of migrating to SSR, SSG, or ISR?
- How will the SEO of the application be impacted by the different rendering modes?
The infinite scroll feature, adding items to the cart, and the cart modal cannot be migrated to the server side because they require user interaction and the browser’s API. However, it could be beneficial to have the first “page” (here we refer to “page” as the first iteration of the infinite scroll) rendered on the server side. This approach allows us to display the initial products in the list without layout shift. Also, if a user has previously visited the page, the server-side rendered content will be cached, allowing for faster load times for next users. This is also beneficial for SEO as it ensures that search engines can index the content effectively
Our product list is simple and looks like this:

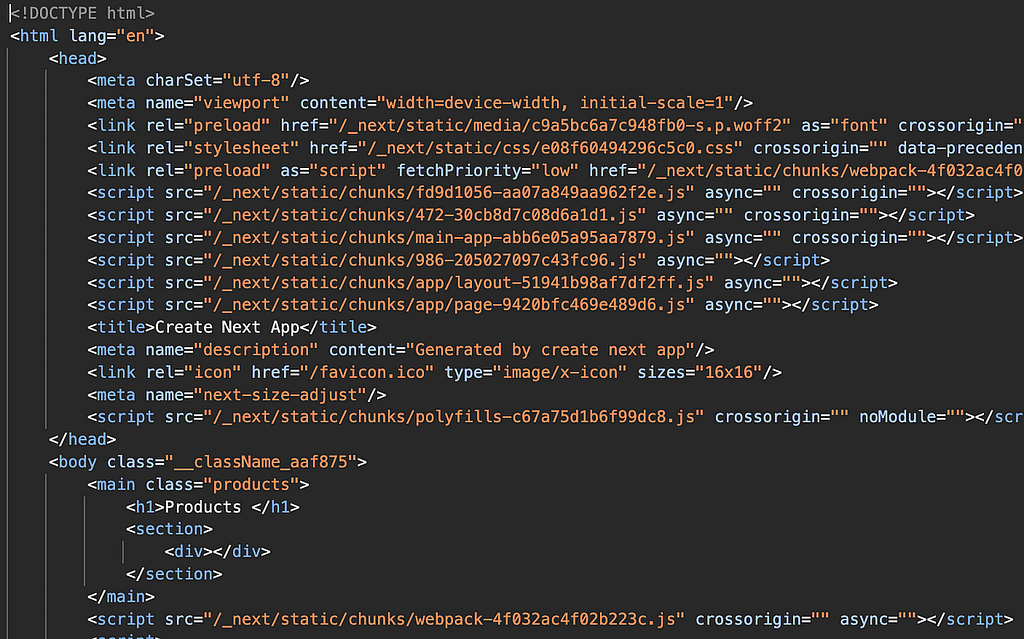
If we show the source code of this page in our browser, we notice that the document rendered by our server returns an empty <section> (it doesn't contain our products). The idea behind SSR/ISR/SSG is to have our initial products included in the HTML of the document.
In practice, what does this look like?
You can clone the repository below, where you will find 4 branches:
- feat/isr: The branch that uses ISR (Incremental Static Regeneration) rendering mode.
- feat/ssg: The branch that uses SSG (Static Site Generation) rendering mode.
- feat/ssr: The branch that uses SSR (Server-Side Rendering) rendering mode.
- main: Our starting branch using CSR (Client-Side Rendering).
https://github.com/damienmoulin/NextSSRMigration/blob/main/src/app/page.tsx
If we take a look at the source code of our CSR application, we notice the following:
Our homepage handles the management of “pages” and the display of the product listing. We also initialize the <InfinitePagination /> component, which takes care of pagination.
Our ClientPage handles the initialization of the infinite scroll component and has a hook for managing the product list, as well as a function for loading pages called changePage.
"use client";

import { fetchProducts } from "@/data/fetchProducts";
import InfinitePagination from "@/presentation/component/InfinitePagination";
import Product from "@/presentation/component/Product";
import { useEffect, useState } from "react";

export default function ClientPage() {
  const [productsList, setProductsList] = useState<ProductList>();
  const [isLoading, setLoading] = useState<boolean>(false);

  useEffect(() => {
    changePage(1);
  }, []);

  const changePage = (page: number) => {
    setLoading(true);
    fetchProducts(page).then((response) => {
      setProductsList({
        products:
          productsList?.products.concat(response.products) || response.products,
        page: response.page,
        numberOfPages: response.numberOfPages,
      });
      setLoading(false);
    });
  };

  return (
    <main className="products">
      <h1>Products</h1>
      <section>
        <InfinitePagination
          numberOfPages={productsList?.numberOfPages || 1}
          fetchData={changePage}
          isLoading={isLoading}
        >
          {productsList?.products?.map((product) => (
            <Product product={product} key={product.id} />
          ))}
        </InfinitePagination>
      </section>
    </main>
  );
}
We want to display our first “page” of products on the server side, meaning that the page construction and the request for the first iteration of products should be done on the server. Therefore, we need to move/modify some of the existing logic.
Let’s start with the following steps:
- Remove the “use client” directive: This will ensure that our page can be rendered on the server. The “use client” directive forces the page to be rendered on the client side.
- Migrate our hooks to a client component (for dynamical interaction and usage of browser API like window and document): This component will displaying the products for the subsequent pages. The goal is to load the products for the following pages and add them to the initial list.
- Load page 1 during the page construction: Display the products in our server-rendered page.
So, we remove all dependencies on hooks from our page.tsx.
import Products from "@/presentation/component/Products";
import { Suspense } from "react";

export default function Page() {
  return (
    <main className="products">
      <h1>Products</h1>
      <section>
        <Suspense fallback={<span>Loading</span>}>
          <Products />
        </Suspense>
      </section>
    </main>
  );
}
We use the <Suspense> component for Products, into which we have migrated the client-side logic. Let's note the few modifications made.
"use client";

import { fetchProducts } from "@/data/fetchProducts";
import React, { FunctionComponent, useState } from "react";
import Product from "./Product";
import InfinitePagination from "./InfinitePagination";

type ProductsProps = {
  pageStart: number;
};

const Products: FunctionComponent<ProductsProps> = ({ pageStart }) => {
  const [productsList, setProductsList] = useState<ProductList>();
  const [isLoading, setLoading] = useState<boolean>(false);

  const changePage = (page: number) => {
    setLoading(true);
    fetchProducts(page + ((pageStart > 0 ? pageStart : 0) - 1)).then(
      (response) => {
        setProductsList({
          products:
            productsList?.products.concat(response.products) ||
            response.products,
          page: response.page,
          numberOfPages: response.numberOfPages,
        });
        setLoading(false);
      }
    );
  };

  return (
    <>
      <InfinitePagination
        numberOfPages={productsList?.numberOfPages || 1}
        fetchData={changePage}
        isLoading={isLoading}
      >
        {productsList?.products?.map((product) => (
          <Product product={product} key={product.id} />
        ))}
      </InfinitePagination>
    </>
  );
};

export default Products;
We have extracted the <main>, the title, and the <section> which is our container for our product list, because the first page will be rendered by the parent component.
<main className="products">
  <h1>Products</h1>
    <section>
       ...
    </setion>
</main>
Next, we added an input property to our <Products> component (CSR). The pageStart prop allows us to start fetching products from a specific index (this will enable us to start at page 2, since page 1 will already be rendered on the server side).
type ProductsProps = {
  pageStart: number;
};
For the changePage function, we will use the pageStart prop to calculate the page to display. We won't modify the <InfinitePagination> component (CSR) since it is a global component meant to be reused in various places (its responsibility is to increment pages on scroll in the browser, and it stops there).
So, we will modify our changePage function to take the page index into account.
const changePage = (page: number) => {
    setLoading(true);
    fetchProducts(page + ((pageStart > 0 ? pageStart : 0) - 1)).then(
      (response) => {
        setProductsList({
          products:
            productsList?.products.concat(response.products) ||
            response.products,
          page: response.page,
          numberOfPages: response.numberOfPages,
        });
        setLoading(false);
      }
    );
  };
If we refresh our page, we notice that visually and functionally nothing has changed.
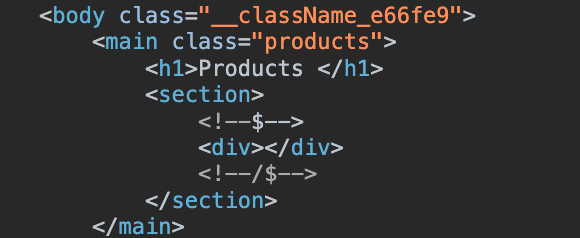
We notice that our section, which is supposed to host our products, is empty. Indeed, we are still missing the first iteration (page 1) of our products. This will be done server-side.
So, we need to:
- Call fetchProducts(1), with 1 being our first page.
- Use this list of products to display them in our HTML using a loop.
- Inform our <Products> component that the first page it will have to load will be the 2nd
import { fetchProducts } from "@/data/fetchProducts";
import Product from "@/presentation/component/Product";
import Products from "@/presentation/component/Products";
import { Suspense } from "react";

export const dynamic = "force-dynamic";

export default async function Page() {
  const productsList = await fetchProducts(1);

  return (
    <main className="products">
      <h1>Products</h1>
      <section>
        <>
          {productsList.products.map((product) => (
            <Product product={product} key={product.id} />
          ))}
          <Suspense fallback={<span>Loading</span>}>
            <Products />
          </Suspense>
        </>
      </section>
    </main>
  );
}
Note that <Product> uses hooks that require user interaction. Therefore, we need to indicate to the <Product> component that it should only render on the client side using the 'use client' directive.
However, <Product> will also be rendered by the client thanks to the hydration principle of Next.js (this means that the component is rendered server-side to provide an initial version of the page, then it is 'reactivated' client-side to allow dynamic interactions).
We can observe by inspecting our page that the document rendered by the server now contains the first 10 products (which corresponds to the first page).
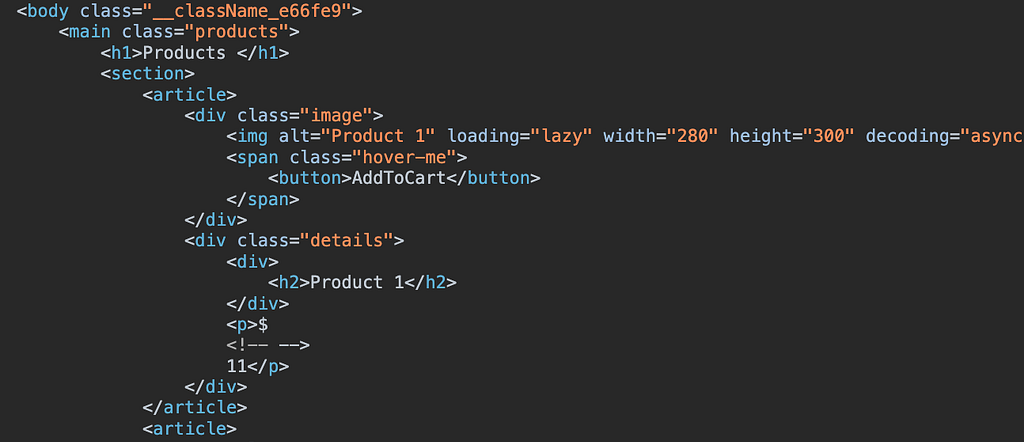
We now have an initial server-side render followed by client-side interaction to load and display the next pages based on user actions (in this case, our infinite scroll).
To verify this, we can disable JavaScript in our browser.

Our page still displays because the server returns a pre-built HTML page. Additionally, we can see that we have our first 10 products.

We therefore have a server-side rendered page with client-side components that enable interaction.
But which rendering mode are we using here?
Rendering Modes explained
The SSG rendering
In this configuration, we are using SSG because we do not use any cache policy for our data fetch. It therefore uses the default cache policy (we are thus caching our product data). Additionally, we do not use any dynamic functions (headers(), searchParams(), cookies()) as input for our page. Dynamic functions rely on information that can only be known at request time, such as a user’s cookies, current request headers, or URL search parameters.
As shown in the table below, in our case we are using static rendering. And since we do not have any revalidation conditions (tag, or revalidate), the page is rendered using SSG and not ISR.

If we run the build command for our application:

We notice that our “/” page is built. I invite you to try running the application and using our static page; you will notice that upon refreshing, our products never change. Indeed, only a new build of the application will re-execute the page code and the fetchProducts function.
The SSR Rendering
If we want to use the SSR rendering mode, we must either use a dynamic function (which is not our case here) or decide not to cache our product data.
export async function fetchProducts(page: number): Promise<ProductList> {
  return (
    await fetch(`http://localhost:3000/api/products?page=${page}`, {
      cache: "no-store", //On ne met pas en cache la réponse
    })
  ).json();
}
We can now build our application and start our server. We notice that upon refreshing our page, the products are different; our fetchProducts function is indeed re-executed each time.
The ISR Rendering
The ISR rendering mode can be done in several ways:
- Revalidation by lifetime
- Revalidation by tag
- Revalidation by path
Revalidation by lifetime
You just need to add the revalidate constant (duration in seconds) to our page.
It is possible to add the revalidate parameter to the data fetch:
export const revalidate = 30; // We specify the lifespan of the page
// in seconds before it is re-rendered on demand.
OR
await fetch(`http://localhost:3000/api/products?page=${page}`, {
      next: {
        revalidate: 30, // data cache lifespan in seconds
      },
    })
On my product page if I wait more than 30 seconds and refresh, I trigger a new render because the cached page has expired.
Revalidation by Tag
The revalidateTag function in Next.js allows purging cached data on demand for a specific cache tag. In the case of ISR usage, this allows, for example, purging our product data when an update is made in the data API, thus triggering the build of a new page. It is also possible, in the case of SSR usage, to use revalidation by tag, where purging our product data does not trigger a page rebuild but only a data purge.
To implement revalidation by tag, you just need to modify the fetch to add one or more tags.
await fetch(`http://localhost:3000/api/products?page=${page}`, {
      next: {
        tags: ["products"], //We define one or more tag for this request
      },
    })
It is then possible to invalidate this tag (therefore clear the products data) with the nextJs revalidateTag function.
revalidateTag(tag);
Here we will create a revalidation API route:
src/app/api/revalidate/route.ts
import { NextRequest } from "next/server";
import { revalidateTag } from "next/cache";

export async function GET(request: NextRequest) {
  const tag = request.nextUrl.searchParams.get("tag");
  if (!tag) {
    return Response.json({
      revalidated: false,
      error: "Missing tag",
    });
  }
  revalidateTag(tag);
  return Response.json({ revalidated: true, now: Date.now() });
}
We can now build our application and test this rendering mode.
Let’s call our revalidate URL http://localhost:3000/api/revalidate?tag=products

Then we notice that if we refresh our product list, it have indeed been updated:

Revalidation by Path
Just like revalidation by tag, it is possible to implement revalidation by path (route). We modify our revalidation route to accept a searchParams path and thus be able to invalidate a path:
src/app/api/revalidate/route.ts
import { NextRequest } from "next/server";
import { revalidatePath, revalidateTag } from "next/cache";

export async function GET(request: NextRequest) {
  const tag = request.nextUrl.searchParams.get("tag");
  const path = request.nextUrl.searchParams.get("path");

  if (path) {
    revalidatePath(path); //On invalide une route
    return Response.json({ revalidated: true, now: Date.now() });
  }

  if (tag) {
    revalidateTag(tag); //On invalide un tag
    return Response.json({ revalidated: true, now: Date.now() });
  }

  return Response.json({
    revalidated: false,
    error: "Missing tag or path",
  });
}
If we build our application, load the page for the first time, then call http://localhost:3000/api/revalidate?path=/ to invalidate our home. And when we return to it, it will have been re-rendered.
Conclusion
There are many advantages to delegating part of our application’s rendering to the server (performance, SEO, API availability issues); however, this requires planning in advance what can and should be rendered by the server.
It is important to be aware of this solution and to consider it from the early stages of your projects. A good separation of your logic and components is also essential to be able to switch between these two rendering modes. We have reviewed the server-side rendering methods, and each has its advantages. However, for all server-side rendering modes, the major benefit is in SEO, as much more information is available to indexing robots compared to client-side rendering.
I encourage you to take control of the application and also test its SEO impact.
For more updates, visit ekino’s website and follow us on LinkedIn.
[NextJs 13] Balancing Server-Side Rendering and Client-Side Interaction was originally published in ekino-france on Medium, where people are continuing the conversation by highlighting and responding to this story.